1
2
3
4
5
6
7
8
9
10
11
12
13
14
15
16
17
18
19
20
21
22
23
24
25
26
27
28
29
30
31
32
33
34
35
36
37
38
39
40
41
42
43
44
45
46
47
48
49
50
51
52
53
54
55
56
57
58
59
60
61
62
63
64
65
66
67
68
69
70
71
72
73
74
75
76
77
78
79
80
81
82
83
84
85
86
87
88
89
90
91
92
93
94
95
| /*
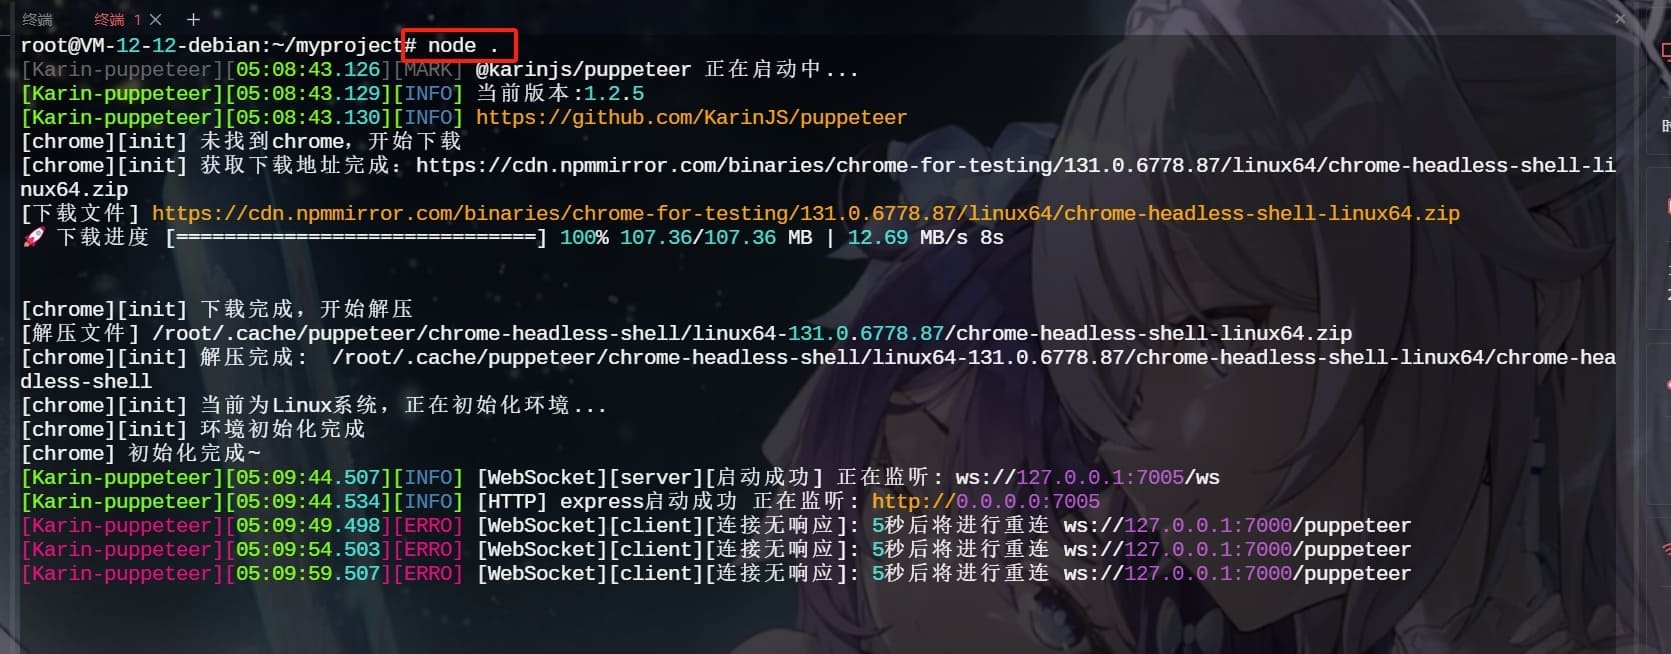
1. 随便打开一个空的文件夹 执行: pnpm init && pnpm install @karinjs/puppeteer && node .
2. 将此文件放到 plugins/example/render.js
详情查看: https://github.com/KarinJS/puppeteer
*/
import path from 'node:path'
import fetch from 'node-fetch'
import renderer from '../../lib/puppeteer/puppeteer.js'
import Renderer from '../../lib/renderer/Renderer.js'
const timeout = 120
const authorization = '123456'
const host = 'http://127.0.0.1:7005/puppeteer'
const render = new Renderer({ id: '@karinjs/puppeteer', type: 'image', render: 'screenshot' })
const renderScreenshot = async (name, data, multiPage = false) => {
const file = savePath(name, data)
const body = {
file,
selector: '#container',
type: data.imgType,
quality: data.quality,
encoding: 'base64',
omitBackground: data.omitBackground,
// 如果全是静态资源 这里可以删掉
pageGotoParams: data.pageGotoParams || {
waitUntil: 'networkidle2'
},
waitForSelector: ['#container'],
}
if (multiPage) {
body.multiPage = data.multiPage ? data.multiPageHeight : 4000
}
const result = await fetchTimeout(host, {
method: 'POST',
headers: {
'Content-Type': 'application/json',
authorization
},
body: JSON.stringify(body)
}, timeout)
return multiPage ? await result.json() : `base64://${await result.text()}`
}
renderer.screenshot = async (name, data) => {
const base64 = await renderScreenshot(name, data)
return base64 ? segment.image(base64) : base64
}
renderer.screenshots = async (name, data) => {
const images = await renderScreenshot(name, data, true)
const list = images.map(base64 => segment.image(`base64://${base64}`))
return list.length > 0 ? list : false
}
/**
* 渲染模板
* @param {string} name 模板名称
* @param {object} data 模板数据
*/
const savePath = (name, data) => {
const file = render.dealTpl(name, data)
return `file://${path.resolve(file)}`
}
/**
* 增加超时处理
* @param {string} url 请求的URL
* @param {object} options 请求的选项
* @param {number} timeout 超时时间
* @returns {Promise<import('node-fetch').Response>} fetch的Promise
*/
const fetchTimeout = (url, options = {}, timeout) => {
return new Promise((resolve, reject) => {
const timer = setTimeout(() => {
reject(new Error('fetch timeout'))
}, timeout * 1000)
fetch(url, options)
.then(response => {
clearTimeout(timer)
resolve(response)
})
.catch(error => {
clearTimeout(timer)
reject(error)
})
})
}
|